Wednesday 20 May 2009

Redditch Palace Theatre & Town Hall

I thought I'd take my new lens for quick walk last night and see what I could find in Redditch town centre....

"The Palace Theatre first opened its doors in August, 1913, a comparative latecomer in the wave of new theatre building in which public demand for entertainment had been finding expression since the beginning of the century.

Described as a miniature opera house of classic design and seating, at that time, 660 it boasted every modern facility of the day. Mr H K Hayles was the managing director of the company, the Redditch Palace Ltd and it appears that the cost of building the theatre (which was cited as £9,000) may have been raised by private subscription.

The Palace Theatre used to be a Cine-Variety house which meant that it combined films and variety entertainment on the bill. Until 1929, The Palace ran a mixed bill of fare, but in February of that year, it was being advertised as Palace Super Cinema in April 1930 a Western Electric Sound System was installed and ticket prices were raised to 6d (Pit) and 1/-(circle), due to the cost of installing the new Talkie apparatus.

In 1939, at the beginning of the war the Palace closed in common with places of entertainment elsewhere, but by 1940, was fully in operation with the usual entertainments.

In the late 1940's, films took a back seat at the Palace. Jack Leuty took over the management of the building and ran a series of theatrical entertainments; this lasted until 1952, when new management took over under Mr S G Williams.

By 1954 the lack of artists, good touring shows , rising costs, coupled with the start of transmission of BBC television from Sutton Coldfield and the ease of purchase of sets, all conspired against the independent theatre operator, so much so that on the 19th March 1954 the Indicator ran a report 'Can the Palace be kept open?'

In May 1954 came the shock announcement "Palace to Close Down" ran the headline. Councillor J R Wilkinson, the owner stating to the Indicator - "The town has lost interest, I cannot afford to stay open"

The Palace was to re-open on 21st February 1955, as a Roller Skating Rink , the raked floor had gone the stage etc, all altered to suit this new form of public entertainment. By 1959, the Palace Theatre became a Dance Hall, from then it led a life in mixed use, including in the late 1960's being used as a Bingo Hall.

In 1967 the Development Corporation bought the Palace and handed it over to Redditch Urban District Council, it opened on September 11th 1971 with a show called Between the Bars featuring that master musician Donald Swann.

By 1970 the fate of the Palace was more or less settled. Multi-Entertainment Centres were now being thought of in other areas and with Redditch being a developing town it was decided to refit the Palace for theatrical use.

It was opened by Mr Peter Walker MP, the Secretary of State for the Environment, on the 11th September 1970, Still retaining the Palace name it became a multi purpose venue. Seats in the stalls were now stackable, allowing for many uses of the floor area. Other additions included moving the dressing rooms from the front of the building to the side taking over what had been part of Shrimptons Needle Factory and adding the present foyer extensions. Administration offices were created where the dressing rooms had previously been. In 1975 a Buy a Seat Campaign was launched and the stalls were fitted out with new seats.

In 1982 a private theatre group took it over under the title of the Mercian Theatre and Arts Federation but a report in the Indicator and Chronicle in April summed it up after only 60 people turned up to see a concert. Just five of them were from Redditch.
"The fate of the Redditch Palace is in the hands of the audience."

The Redditch Borough Council took over the management and running of the building in 1985 and since then has continued a tradition of providing a wide mix of entertainment to please every palate." [Text taken from Palace Theatre website]

I also took some shots of the Town Hall, it's not quite as historic as the palace theatre, but it looks fairly interesting anyway. I remember when I was a kid I used to think it was some kind of giant transformer and stared at it waiting for it to transform....


Monday 18 May 2009

Wide Angle Lens

Being a bit annoyed at times when shooting landscapes of not being able to get the proper composition I wanted I recently invested in a wide angle lens.

Up until a couple of weeks ago I made do with my wide angle kit lens, an 18-55mm to work on landscapes. However, on many occasions I found myself struggling to get a proper composition with enough foreground interest and sky.

I haven't yet made a leap to a full frame camera yet, so the actually readings on the lens, i.e. 18mm would have to be multiplied by the crop factor of my camera (x1.6 for Canon's). So 18mm is actually 28.8mm. Full frame sensor camera's are simply cameras in which the digital sensor that record the image are the same size as frame on a 35mm film camera.

I won't go into a technical review here as you can find plenty of those online. The particular lens I bought is a Sigma 10-20mm f/4-5.6 EX DC HSM. I did quite a bit of research before I chose this, and generally it came out top for price V performance, you'd be paying a couple of hundred more for something that's marginally better; for me this was more than fine.

So I've attached two photos below to compare the angle of view with my kit lens. I setup the shot using a tripod and camera set to manual mode, all I did between shots was simply change the lens:

18mm kit lens:


10-20mm Sigma @ 10mm:

Saturday 16 May 2009

My Idea on the BBC news!

It's Saturday morning and I'm sat here watching the BBC breakfast news show. They've just had some guy on with his daughter about his photography project....

He's been taking photos of his daughter everyday since she was born. She's now 13 and has a record of her physical growth for her entire life.

For those of you who know me, you'll probably know that I've been going on about /planning my new baby project. I'll be a daddy soon and have been thinking about photographing my baby to keep a visual record of his/her development. However, I don't think I'll do it everyday, and I'm unsure what intervals to take the photos, every week, two weeks or every month?

Friday 8 May 2009

High Dynamic Range (HDR)

So you've probably heard me mention HDR and seen some rather strange looking photos where the light just doesn't look natural and wondered how it's done?

Well before I explain how, I'll explain why...

When we look at a scene our eyes and brain work together to process all the light, colours, tints, shadows etc. Our brains are like super computers able to adapt to and identify variations in different areas of a scene.

Imagine a room with a window (you're most likely in one now), now look towards the window (if it's day time) you should be able to see what's outside as well as what's inside the room. Now get your camera (phone, compact, SLR) and take a photo looking out towards the window. Unless it's a really dull, dark and gloomy day you're most likely going to either have one of two photos:

  1. The room is exposed properly, but you can't really see what's outside as it's all blown highlights (i.e. all white)
  2. You can see the view from the window, but everything inside the room looks really dark or black.
Your camera can't adapt to differences in one scene, it can only expose correctly for one part of the scene for any one photo. Our eyes are constantly adapting for every part of the scene, faster than it takes to think about.

This not a new technique by any means. In the 1850's Gustave Le Gray, a Frenchman famous for technical innovations in photography, produced some of the first exposure blended photos. He wanted to find a way of correctly exposing for both sky and sea in his seascapes and did so by taking the correctly exposed halves from each negative and combining them to produce one positive photo. The photo below was taken in 1857 and titled 'The Great Wave"

Gustave Le Gray (French, 1820–1884)
The Great Wave, Sète, 1857
Albumen silver print from glass negative; 33.7 x 41.4 cm (13 1/4 x 16 5/16 in.)

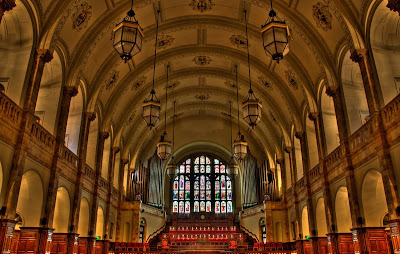
A more recent example of HDR can be found in the photo below. Without HDR I would've only be able to expose correctly for either the stain glass window or the details in the hall, not both at the same time.


This HDR effect can be applied to all sorts of similar situations, both indoors and outdoors, such as sunset/sunrise, landscapes where the difference between shadows and light areas is too great for cameras to capture correctly.

Clouds are another good application for HDR; often in photos they can appear slightly flat, and by this I mean that you can always make out the full texture and depth of the cloud from a normal photo. Have a look at my cloud photo one of my earlier posts, you can clearly make out the shadows, highlights which gives a real sense of texture and depth as well as drama. In that particular photo they seem slight more dramatic than usual, and that's because I had one very extreme highlight, the sun, which I had to expose for the best I could.

Now enough of the boring bit, here how you do it....

Essentially you need a camera that you can alter shutter speeds with, so that's either an SLR (digital or film) or a bridge camera. Some compacts may have this feature, but only a few.

  1. for digital SLR only: set the camera in aperture priority mode and from the main menu set auto exposure bracketing to the widest settings available. Compose your photo and press the shutter button. You camera will take automatically 3 exposures, one with blown highlights (revealing detail in the shadows), a second that is underexposed (revealing detail in the highlights) and a third photo that does it's best to correctly expose for light and dark areas (essentially this is used for mid tones).
  2. for digital/film SLR and bridge: as above, put the camera into aperture priority mode and compose your photo. At this point you need to figure out what exposure settings you'll need and if you're using a film SLR then you'll need to work this out from experience. On the other hand with a digital SLR or a bridge you can take some test shots at different shutter speeds to figure out which speeds to use for your three photos. Once you've figured this out take the photos and hey presto, put them onto your computer. For film SLR cameras this obviously means getting the films processed and scanned in to you computer.
A quick note before I finish up....
Sensitivity: You should try not to change the aperture between shots, as doing this will result in the focus being different in all three images (making it a mess). Keep it the same throughout. Another handy tip to bear in mind is to keep the ISO/ASA as low as possible. When exposing for shadows, you're increasing the noise in photo, the lower the ISO/ASA the lower noise levels.

OK so by now you should know a little bit more about what HDR is, but you only know half of the story when it comes to making a HDR photo...

I've talked about how to prepare for a HDR photo by taking multiple exposures, and now comes the slightly more difficult bit. Once you've uploaded your photos to your computer you need to merge them to create you actual HDR image, and for that you need some software. There are a number of tools currently available that help you achieve this:

  • Photoshop - this is probably the most popular image editing tool on the market, although it is quite overkill for most people and has a steep learning curve. If you're simply editing a few photos then it's not very cost effective (Elements or Lightroom is much better choice).

  • Photomatrix Pro - like photoshop this is probably the most common tool for HDR processing. Unlike Photoshop however, this tool is specifically built to process HDR photography, and you can't do much else with it.
There are a few other tools out there, but I've mentioned these as you're most likely to be able to find more support and tutorials for these titles online. There's one problem with HDR photography, initially it was designed to help balance and bring out the details in all areas of the image. However, if you Google the word "HDR" and browse the images you'll see some quite extreme examples of HDR. It's quite easy to get carried away with the settings and produce quite garish images. If you have the right photograph though, then a more extreme HDR setting may be quite fitting. It is a personal thing though and there are a lot of purists out there who simply don't like any kind of HDR treatment.

You can download a free trial version of Photoshop from the Adobe website and Photomatrix from this website:

http://www.hdrsoft.com/examples.html
- link also shows what you can achieve with the software as well as user examples.

This page provides a list of resources for guides and tutorials:
http://www.hdrsoft.com/resources/index.html

Friday 1 May 2009

Balls of Steel

Fisheye!

Yes, that's what they call lenses which have an extremely wide focal length, below 10mm usually. They're as close as you can get to a 360 degree view from a single lens. Basically the front end of the lens is really bulbous (convex) and it shows in the photos you take. They're usually around 4mm and aren't cheap either.

The photos have plenty of distortion because of this extremely wide angle. Most photos taken with these lenses have large black border with a circular image in the middle, simply because the focal length is smaller than the size of the image sensor on the camera.

Anyway, I've found the next best thing. I found these balls I must have bought some years ago, the ones you massage into your palms for stress relief and noticed the extremely wide angle of view they produce and decided to have a play.