Well before I explain how, I'll explain why...
When we look at a scene our eyes and brain work together to process all the light, colours, tints, shadows etc. Our brains are like super computers able to adapt to and identify variations in different areas of a scene.
Imagine a room with a window (you're most likely in one now), now look towards the window (if it's day time) you should be able to see what's outside as well as what's inside the room. Now get your camera (phone, compact, SLR) and take a photo looking out towards the window. Unless it's a really dull, dark and gloomy day you're most likely going to either have one of two photos:
- The room is exposed properly, but you can't really see what's outside as it's all blown highlights (i.e. all white)
- You can see the view from the window, but everything inside the room looks really dark or black.
This not a new technique by any means. In the 1850's Gustave Le Gray, a Frenchman famous for technical innovations in photography, produced some of the first exposure blended photos. He wanted to find a way of correctly exposing for both sky and sea in his seascapes and did so by taking the correctly exposed halves from each negative and combining them to produce one positive photo. The photo below was taken in 1857 and titled 'The Great Wave"
The Great Wave, Sète, 1857
Albumen silver print from glass negative; 33.7 x 41.4 cm (13 1/4 x 16 5/16 in.)
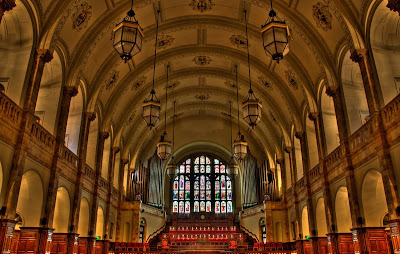
A more recent example of HDR can be found in the photo below. Without HDR I would've only be able to expose correctly for either the stain glass window or the details in the hall, not both at the same time.

This HDR effect can be applied to all sorts of similar situations, both indoors and outdoors, such as sunset/sunrise, landscapes where the difference between shadows and light areas is too great for cameras to capture correctly.
Clouds are another good application for HDR; often in photos they can appear slightly flat, and by this I mean that you can always make out the full texture and depth of the cloud from a normal photo. Have a look at my cloud photo one of my earlier posts, you can clearly make out the shadows, highlights which gives a real sense of texture and depth as well as drama. In that particular photo they seem slight more dramatic than usual, and that's because I had one very extreme highlight, the sun, which I had to expose for the best I could.
Now enough of the boring bit, here how you do it....
Essentially you need a camera that you can alter shutter speeds with, so that's either an SLR (digital or film) or a bridge camera. Some compacts may have this feature, but only a few.
- for digital SLR only: set the camera in aperture priority mode and from the main menu set auto exposure bracketing to the widest settings available. Compose your photo and press the shutter button. You camera will take automatically 3 exposures, one with blown highlights (revealing detail in the shadows), a second that is underexposed (revealing detail in the highlights) and a third photo that does it's best to correctly expose for light and dark areas (essentially this is used for mid tones).
- for digital/film SLR and bridge: as above, put the camera into aperture priority mode and compose your photo. At this point you need to figure out what exposure settings you'll need and if you're using a film SLR then you'll need to work this out from experience. On the other hand with a digital SLR or a bridge you can take some test shots at different shutter speeds to figure out which speeds to use for your three photos. Once you've figured this out take the photos and hey presto, put them onto your computer. For film SLR cameras this obviously means getting the films processed and scanned in to you computer.
Sensitivity: You should try not to change the aperture between shots, as doing this will result in the focus being different in all three images (making it a mess). Keep it the same throughout. Another handy tip to bear in mind is to keep the ISO/ASA as low as possible. When exposing for shadows, you're increasing the noise in photo, the lower the ISO/ASA the lower noise levels.
OK so by now you should know a little bit more about what HDR is, but you only know half of the story when it comes to making a HDR photo...
I've talked about how to prepare for a HDR photo by taking multiple exposures, and now comes the slightly more difficult bit. Once you've uploaded your photos to your computer you need to merge them to create you actual HDR image, and for that you need some software. There are a number of tools currently available that help you achieve this:
- Photoshop - this is probably the most popular image editing tool on the market, although it is quite overkill for most people and has a steep learning curve. If you're simply editing a few photos then it's not very cost effective (Elements or Lightroom is much better choice).
- Photomatrix Pro - like photoshop this is probably the most common tool for HDR processing. Unlike Photoshop however, this tool is specifically built to process HDR photography, and you can't do much else with it.
You can download a free trial version of Photoshop from the Adobe website and Photomatrix from this website:
http://www.hdrsoft.com/examples.html - link also shows what you can achieve with the software as well as user examples.
This page provides a list of resources for guides and tutorials:
http://www.hdrsoft.com/resources/index.html
This is great - more of the old photos, too, with your own updates.
ReplyDelete